 Most often, we use compressors to tame the dynamics of a recording. Like all recording tools, though, compressors have less-obvious uses for shaping sound.
A compressor raises the level of quieter elements in a signal. This tends to “fatten” the recorded sound, which can add a lot of character, especially on drums and vocals. However, the effect is most pronounced when the signal is heavily compressed, and over-compression usually kills the dynamics of a performance.
What is parallel compression?
Parallel compression offers a good compromise. In its most common implementation, parallel compression refers to mixing a dry signal with a heavily compressed copy of itself. The dynamics in the dry signal are preserved while the compressed signal adds body and character to the overall sound. It works for any instrument, but on drums and vocals in particular, the added character can really bring a track to life.
This article from Sound On Sound lays out an approach to parellel compression in Logic. (Note, though, that the article incorrectly calls the technique “sidechain compression.” Sidechain compression is an unrelated procedure used to implement ducking, better described here: Sidechain compression in Logic.)
SoS’s method involves duplicating the track on which parallel compression will be performed. I prefer to use a bus or effects send which allows me to pass many tracks through the same compressor, handy for fattening related tracks together. But both approaches produce the same end result, so if your DAW or recording platform doesn’t offer busses or sends, you can still use parallel compression.
Hear it in action
Here’s a short drum passage that I’ll use to illustrate this technique in action:
The dry signal comes from 5 mics: Kick, snare, floor tom, and 2 overheads.
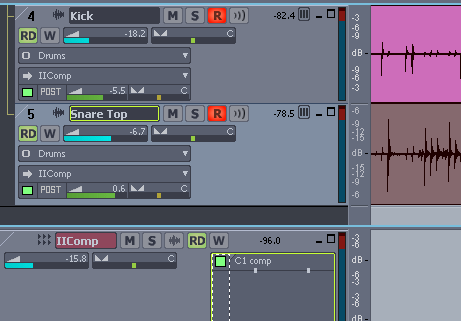
In this first example, I routed the kick and snare drum tracks to a second mix bus, the parallel compressor (“IIComp” as I call it – see the screen shot below,) and mixed the result with the dry signal heard above:
The effect is obvious. Note how the kick drum and snare drum have more body and punch while still sounding dynamic. (In practice, I wouldn’t mix the compressed signal quite so loud. I overdid it here to better illustrate the effect.)
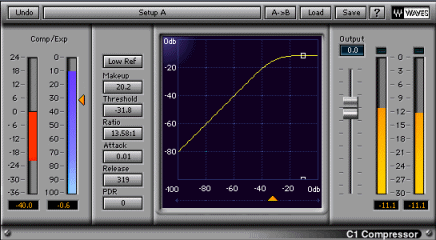
It’s also obvious that the compressor on the parallel bus is really crushing the signal. For this example, and the one below, I used a Waves C1 compressor with a fast attack, a ratio of nearly 14:1, and a hard knee, as shown here:

I took the screen shot during one of the snare hits. Notice that there’s almost 20db of gain reduction. Really crushed!
This is what the compressed signal sounds like by itself:
While I most commonly apply this technique to the kick and snare only, parallel compression can also be used on the overhead microphones:
The effect is more subtle, obvious mostly on the cymbal crashes. However, depending on the sound you need, this less pronounced effect might be perfect.
Finally, here’s a screen shot to help visualize the signal chain I used:

The kick and snare drum tracks are routed to the primary drum bus (not shown) which carries the dry signal, and to the “IIComp” bus which contains the Waves C1 compressor shown above. Note, too, that the IIComp bus has its level reduced by almost 16db. It’s not necessary to mix the dry and compressed signals at the same level. In fact, doing so usually defeats the purpose of using parallel compression as the compressed signal overpowers the dry signal and smears its dynamics.
Other approaches to parallel compression
The examples above show the most common implementation. However, there are as many ways to set up parallel compression as there are ways to configure a compressor. Different attack and release times create different effects, as do different ratios. In my examples, I used a fast attack and slow release, which removes all the transients from the signal. However, with a shorter release time, you can create a “pumping” effect which often adds a distinctive sound.
Further, different compressors have different characters. The free Blockfish compressor, for example, is great for crushing a signal beyond recognition. And when mixed at low levels under a dry track, this “distressed” signal usually adds complimentary qualities.
As with all recording techniques, of course, experimentation is the key to finding sounds that work for you.
UPDATE: See Andy’s comment below about using this technique in a DAW that lacks latency compensation
Subscribe to the Hometracked feed, or receive email updates
for more compressor techniques, and drum recording tips.
Previously: More on compression, Better drum mixes
Tags: compression, drums

21 comments
Trackback URI Comments feed for this article
Great article. I was wondering why you sent the tracks to the CompII bus post-fader. With that setup, any changes to the track fader affect the amount of compression the track gets in the CompII bus. If you send them pre-fader, you can use the track fader to mix the drums in the drum bus without affecting the amount of compression on the kick/snare.
Thanks Dave.
> I was wondering why you sent the tracks to the CompII bus post-fader.
Heh, carelessness :)
I usually set it up the way you described, for the reasons you listed. I just rushed things putting this example together, and overlooked the routing.
Great technique. I use it all the time, but be careful; the compressor plug-in can induce latency, which can shift the phase of the overall drum sound.
If your DAW has plug-in delay compensation, then you needn’t worry, but if it doesn’t (like in Pro-Tools M-Powered/LE *grumblegrumblegrumble*), you have to compensate either by using the time-adjuster plug in on the uncompressed drum bus, or by bouncing the uncompressed drum bus to an audio track, and shifting it backwards a couple of samples after the fact.
Hey Andy, thanks, and sorry I missed your comment before. I added a note to the article because your point is an important one!
Cheers.
fantastic! someone mentioned the words “parallel compression” in a conversation today so i googled it and got this page/site. FUCKING AWESOME! i’ll be here more than at the porn sites, now.
thanks, culligan man!
love the audio samples! and now the dilemma remains; to include the overheads, or not to include the overheads?
Thank you so much for this article. I’m using Ozone 4 and taking a class. The class instructed us to use Ozone’s global setting (in the multiband dynamics section) and adjust the mix level. It works but I found it very confusing as compared to what you described and not with as much control. Thanks!!!
Hi! Nice site!
I often wonder why the received wisdom is to use very short attack times with parallel compression?
When parallel compressing drums I love a long attack time. This allows the snap of the kick and snare to pass through, giving both punch and fatness when combined with the unprocessed track. Of course, your peak levels are going to be a little higher so you need to watch for that.
Similarly on vocals, a long attack accentuates the crispness of hard consonants like “T”, “C”, etc.
With both drums and vocals the release time needs to be set according to the song. I tend to go for short release times, especially on drums, so that the room sound is brought up quickly after the drum hit. To me there’s nothing nicer than a well-recorded kit in a good room through an 1176 with long attack and short release! Punch heaven! Pretty sure that was the Led Zep 4 sound!
Here is a video of how to us Parallel Compression in Pro Tools 8
Thanks a lot for this awesome tutorial.
The only thing I don’t understand is that when I listen with the C1 compressor it has some kind of hard panning in it and I don’t understand where it came from.
I try with other compressor and only the C1 come with this kind of result.
Does the C1 has some king of panning in it?
Thank you.
pog
I can hear the compression effect on the second mp3 sample isolated on your third mp3. Sounds like an artifact giving the kick drum an unnatural texture. Using Sony MDR V6 headphones.
It is an improvement over the dry version but it sounds like regular reverb to give the effect of listening in a live room with a bit of echo instead of a heavily dampened sound proofed lab. A 3D sound with a lot of captured clean detail in the recording if not for that slight artifact in the kick.
C1 is a soft knee compressor….C6 or API 2500 are hard knee…for ducking you would want a hard knee compressor, but C1 has a tight attack and works fairly well with ducking.
Parallel compression changed my world. I was never able to get a good pop out of my drums until I started using it. Now I use it on just about every instrument that needs compression.
Wow! So good to see someone else on the blog-sphere helping out people with their audio needs! And my what awesome articles I have read already! Keep up the good work man!
Just wanted to throw in here that my main usage (as of now) for parallel comp is in vocals. Love to squash that second vocal and drop out the lows then do a subtle blend in the main vocal track. Seems to get it to set on top a little neater.